
Save money and change your tyre on your own – or a more lightly scenario would be having to change a tyre when stuck in the bush somewhere – or when you discover a flat tyre just before your ride.
Remember….at Derek Graham Dirt Bikes will always be here when you get stuck, our resident wheel and tyre fundi, Peter, will be happy to do the job for you in a matter of minutes.
Tools needed:
- 2 or more tyre irons (tyre levers) – the longer the better
- 1 cup of a mixture of 1 to 5 of dishwasher soap
- Old paint brush to apply soap mixture
- Tyre change stand (Optional) – makes the process a whole lot easier
Step 1
Remove the valve from the valve stem – often the caps have the valve tool on the end of the cap, just flip it over and use it to remove the valve – anti-clockwise for the real novice.
Step 2
Loosen the lock nuts, to allow the tyre to move around, don’t remove the nut, but loosen it all the way to the end of the thread.
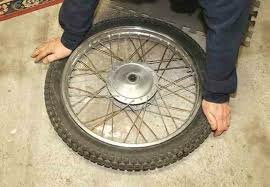
Step 3
Make sure the tyre is stable, not resting on the sprocket as you may bend it, then stand on the tyre to loosen it off the rim, the longer it has been on the bike the more stubborn it will be, but make sure it is loose all around, so that you can get the tyre levers in-between the tyre and the rim.
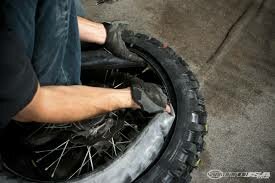
Step 4
Start furthest away from the rim lock and the valve, to work with the part of the tyre that is easiest to move around. Insert the tyre lever in-between the tyre and the rim – not too far as the lever will make a hole in the tube if you insert it too deep, just enough to grab the tyre edge (bead), pull the lever towards the inside of the wheel (hub), and the tyre will move on top of the rim.
Step 5
Use the soap mixture to lubricate the tyre in the areas you are going to work, this helps the tyre slip over the rim, used for removing and installing the new tyre. Take the other tyre lever to repeat the process about 5 centimetres future along the tyre. If you have another lever, report with the extra levers, if not carefully remove the first tyre lever and continue along the tyre. You may have to insert a blunt spacer where you remove the first lever, so that it does not slip back into the rim. Always using the soap mixture to make it easier.
Step 6
Once the one side is on top of the rim, remove the tube.
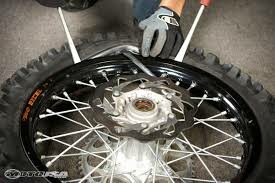
Step 7
Remove the rim lock/s, some tyres have two, some one, make sure they are all loose.
Step 8
Using the same process in the above steps, remove the other side of the tyre over the rim. Remember the soap and small increments, and make sure not to scratch the outer surface of the rim.
Step 9 – inspect
Inspect the tyre for sharp foreign objects that could cause a puncture. Inspect the tube for leaks by inflating it and putting it under white, if not bubbles, you are good to refit.
Step 10 – refitting
Make sure before fitting the tyre, that you have correct direction, there is an arrow on the tyre to indicate which way the tyre should turn. Use the soap for the tyre bead (edge) and the rim, push the one side over the rim with your hands, when it gets difficult use the tyre levers to help it over the rim edge.
Step 11
Install the rim locks, just thread the hut on at the end of the thread so that you have space to move the tyre and rim lock around when installing the tube and tyre.
Step 12
Insert the tube, making sure it is not twisted or cause in-between the rim lock and the rim.Don’t forget to re-insert the valve.
Step 13
Lubricate the tyre bead and the rim and start moving the tyre over the rim using your hands and shoes/boots to start, making sure the tube is far away from the rim edge and the tyre, to prevent pinching and punctures. When it gets too difficult to move the tyre over the rim edge, start using the tyre levers, but be very careful not to insert them too far which will damage the tube. It is a good idea to start on either side of the rim lock, and where the tyre is over the rim, ensure that it is pushed all the way into the rim, giving you more space on the opposite side of the rim to be able to get the tyre over the rim edge.
Step 14
Once the tyre is on, inflate the tyre a little – just enough to get the tube inflated to a round shape. Make sure the tyre is on properly, and then tighten the rim locks – but if you feel resistance too early, check to make sure you have not gotten the tube under the rim lock. Inflate the tyre until you see the tyre pops into the rim equally all the way around the tyre. Bounce the tyre a few times, to make sure everything settles into place.
Step 15
Remove the valve again, to deflate the tube, re-insert it and inflate the tyre to the correct pressure using the manual for the correct amount of air.